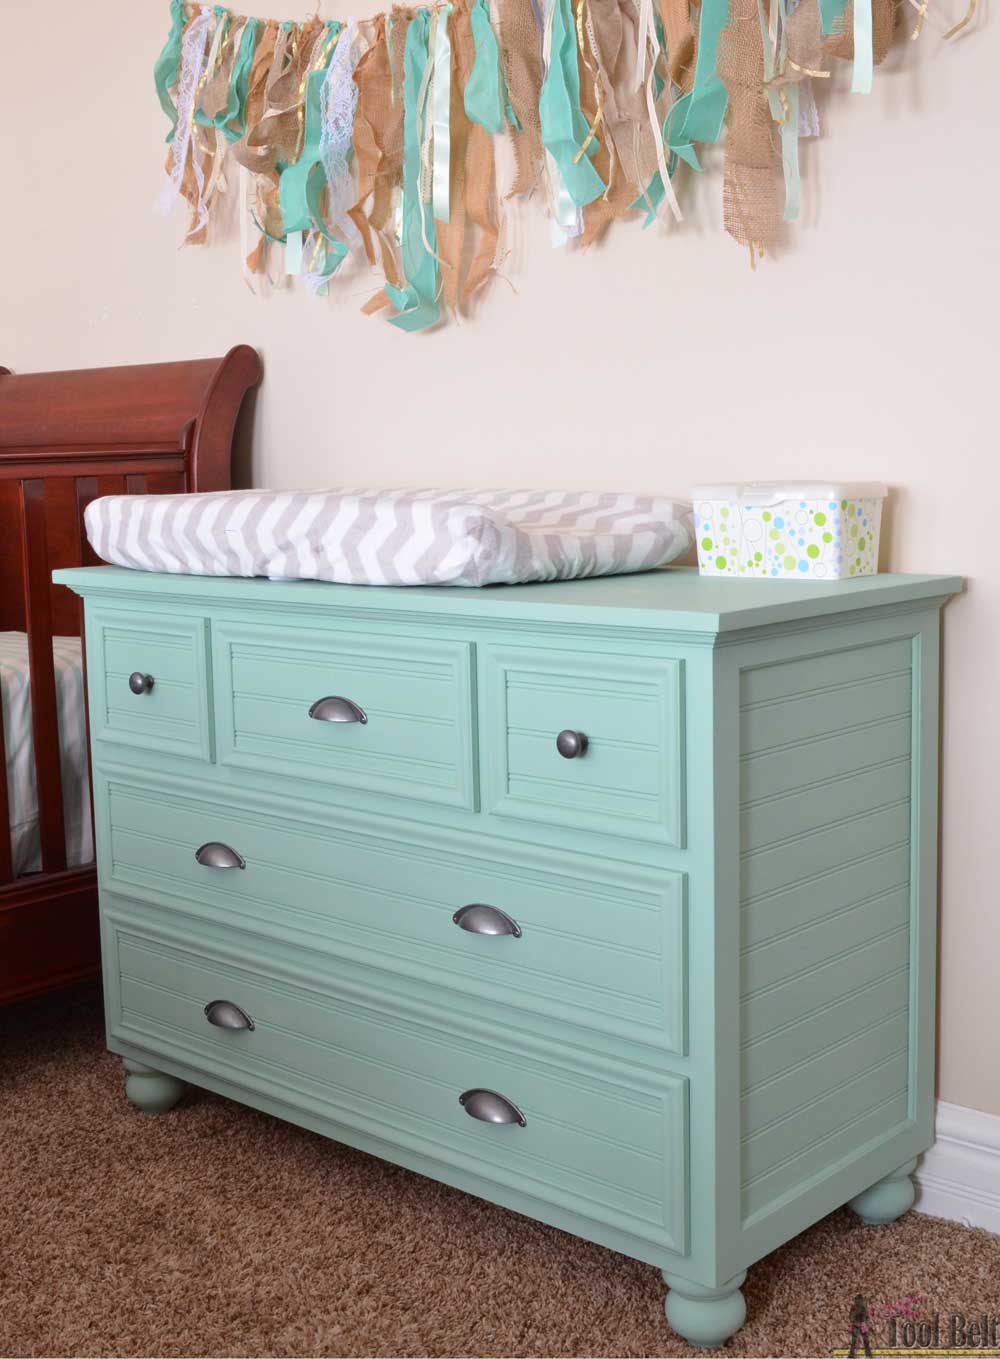
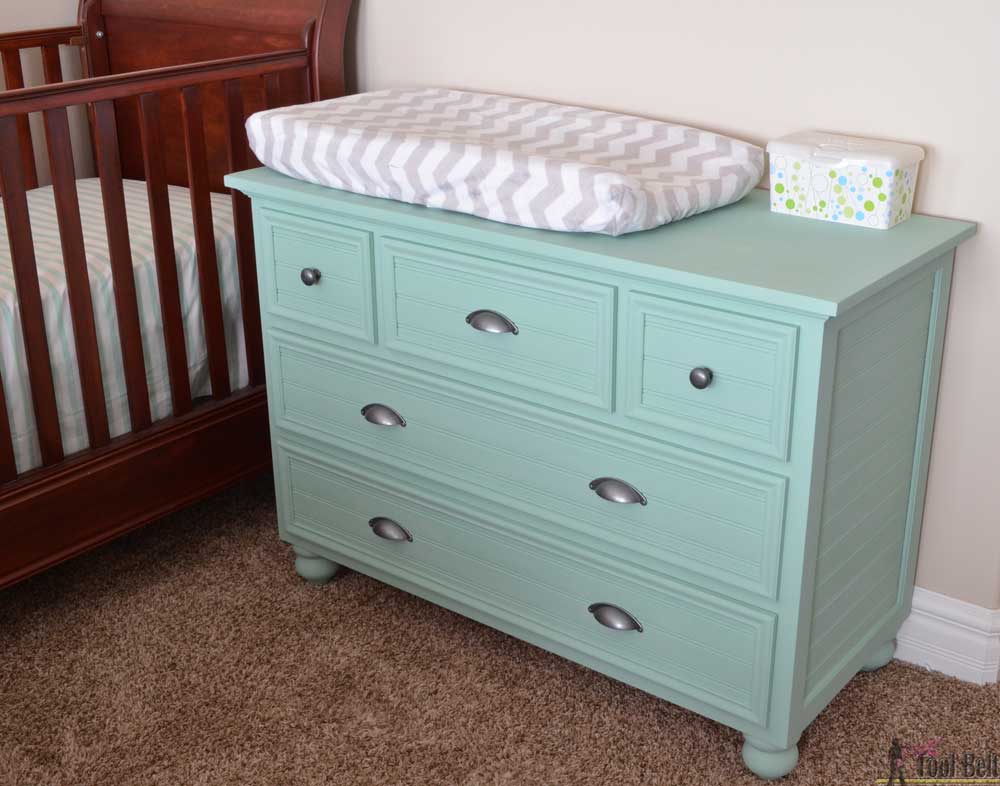
For my first two babies, I used a simple stand as a changing table, it was the exact size of the changing pad but had zero storage. I had plenty of closet space to hold all of their stuff. When baby #3 was coming along, I realized that I had to do something for storing for her stuff, since the other two filled up what storage space I had. Babies need so much stuff, diapers, wipes, special shampoo, bum stuff, clothes clothes clothes, accessories, it never ends. I decided to build her a dresser/changing table. I should have started on it earlier but didn’t know what design I wanted to make.
Earlier my neighbor had redone a few of her daughters rooms with bead board. They had the bead board go about 2/3rds up the wall, so this meant they had a lot of 1/3 sheets of bead board left. She gave me a number of the 1/3 sheets. I thought it would be fun to use up some of the bead board with this dresser. I turned the bead board to go horizontal to give the changing table a little more of a planked wood look.
This post contains some affiliate links for your convenience. Click here to read my full disclosure policy.
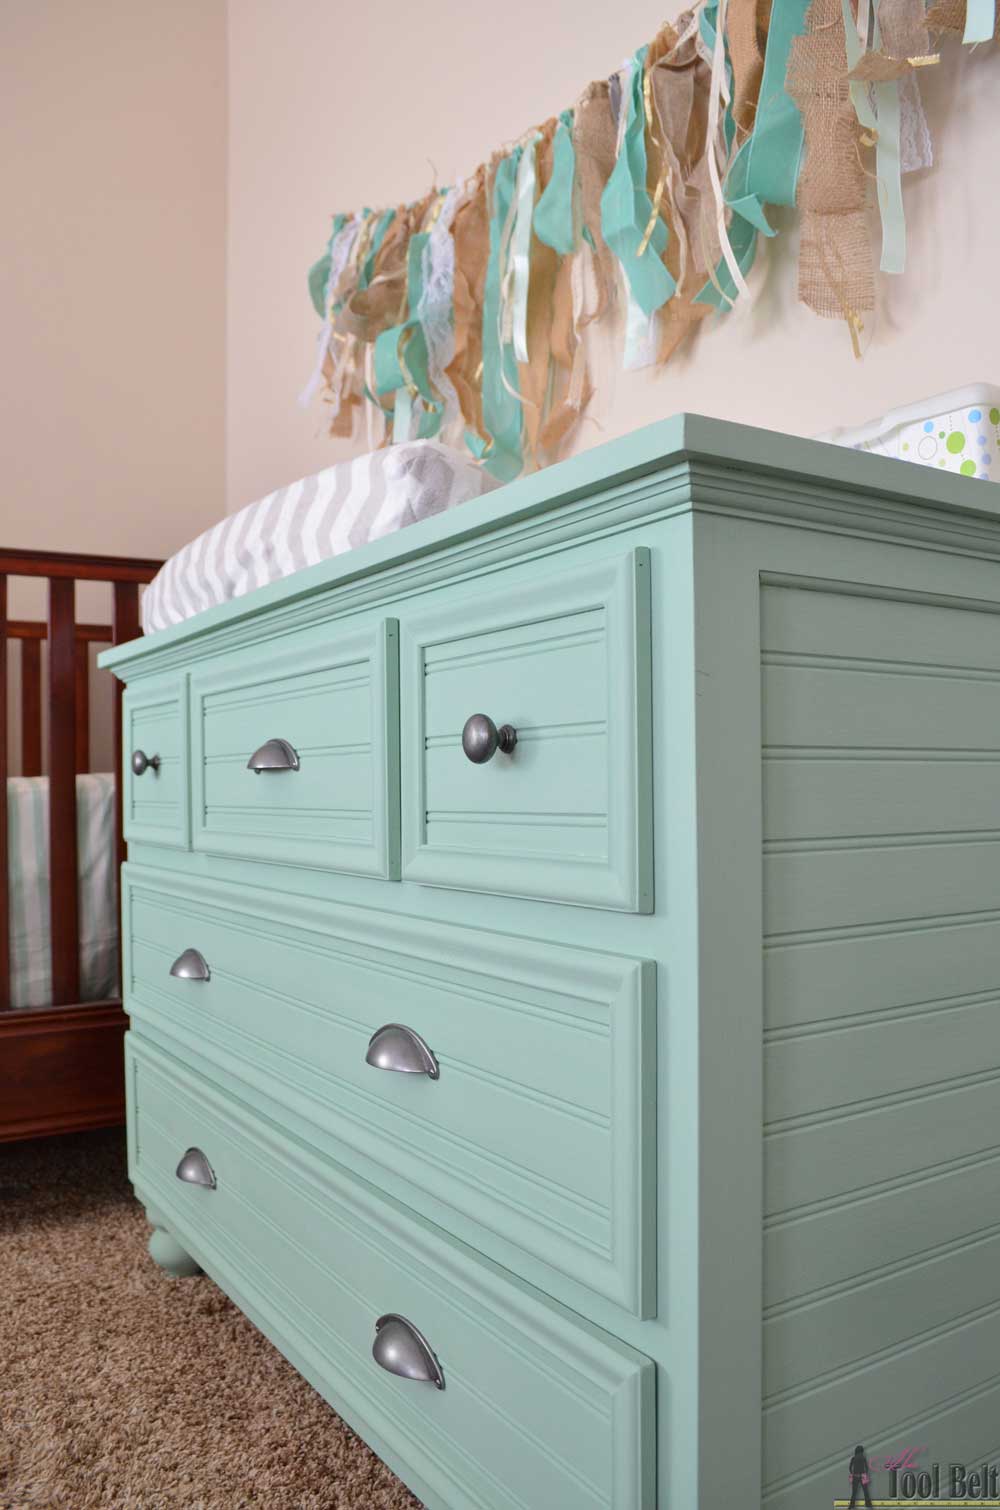
The beautiful minty-blue paint color is Amy Howard Home One Step Paint – Barefoot in the Park!
Of course I was trying to cram in as many projects as possible before the baby came in October. She decided to come a week early…so I wasn’t done Oh well, it was still usable! 3 months later I am finally getting it finished.

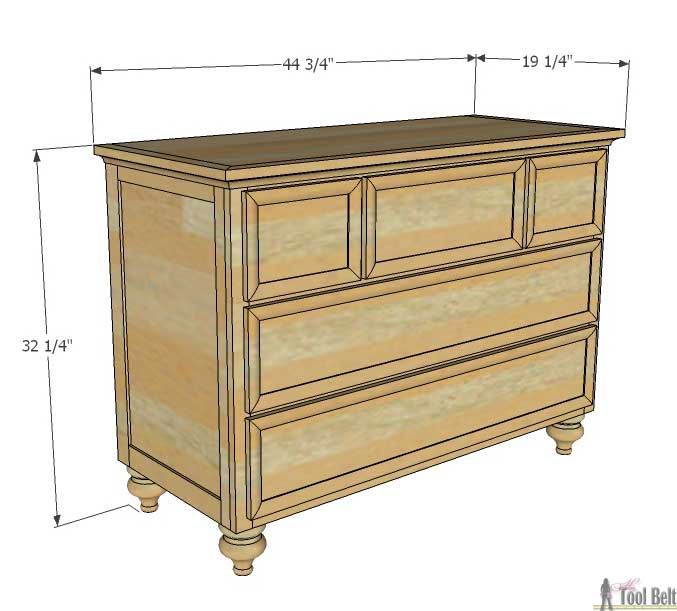
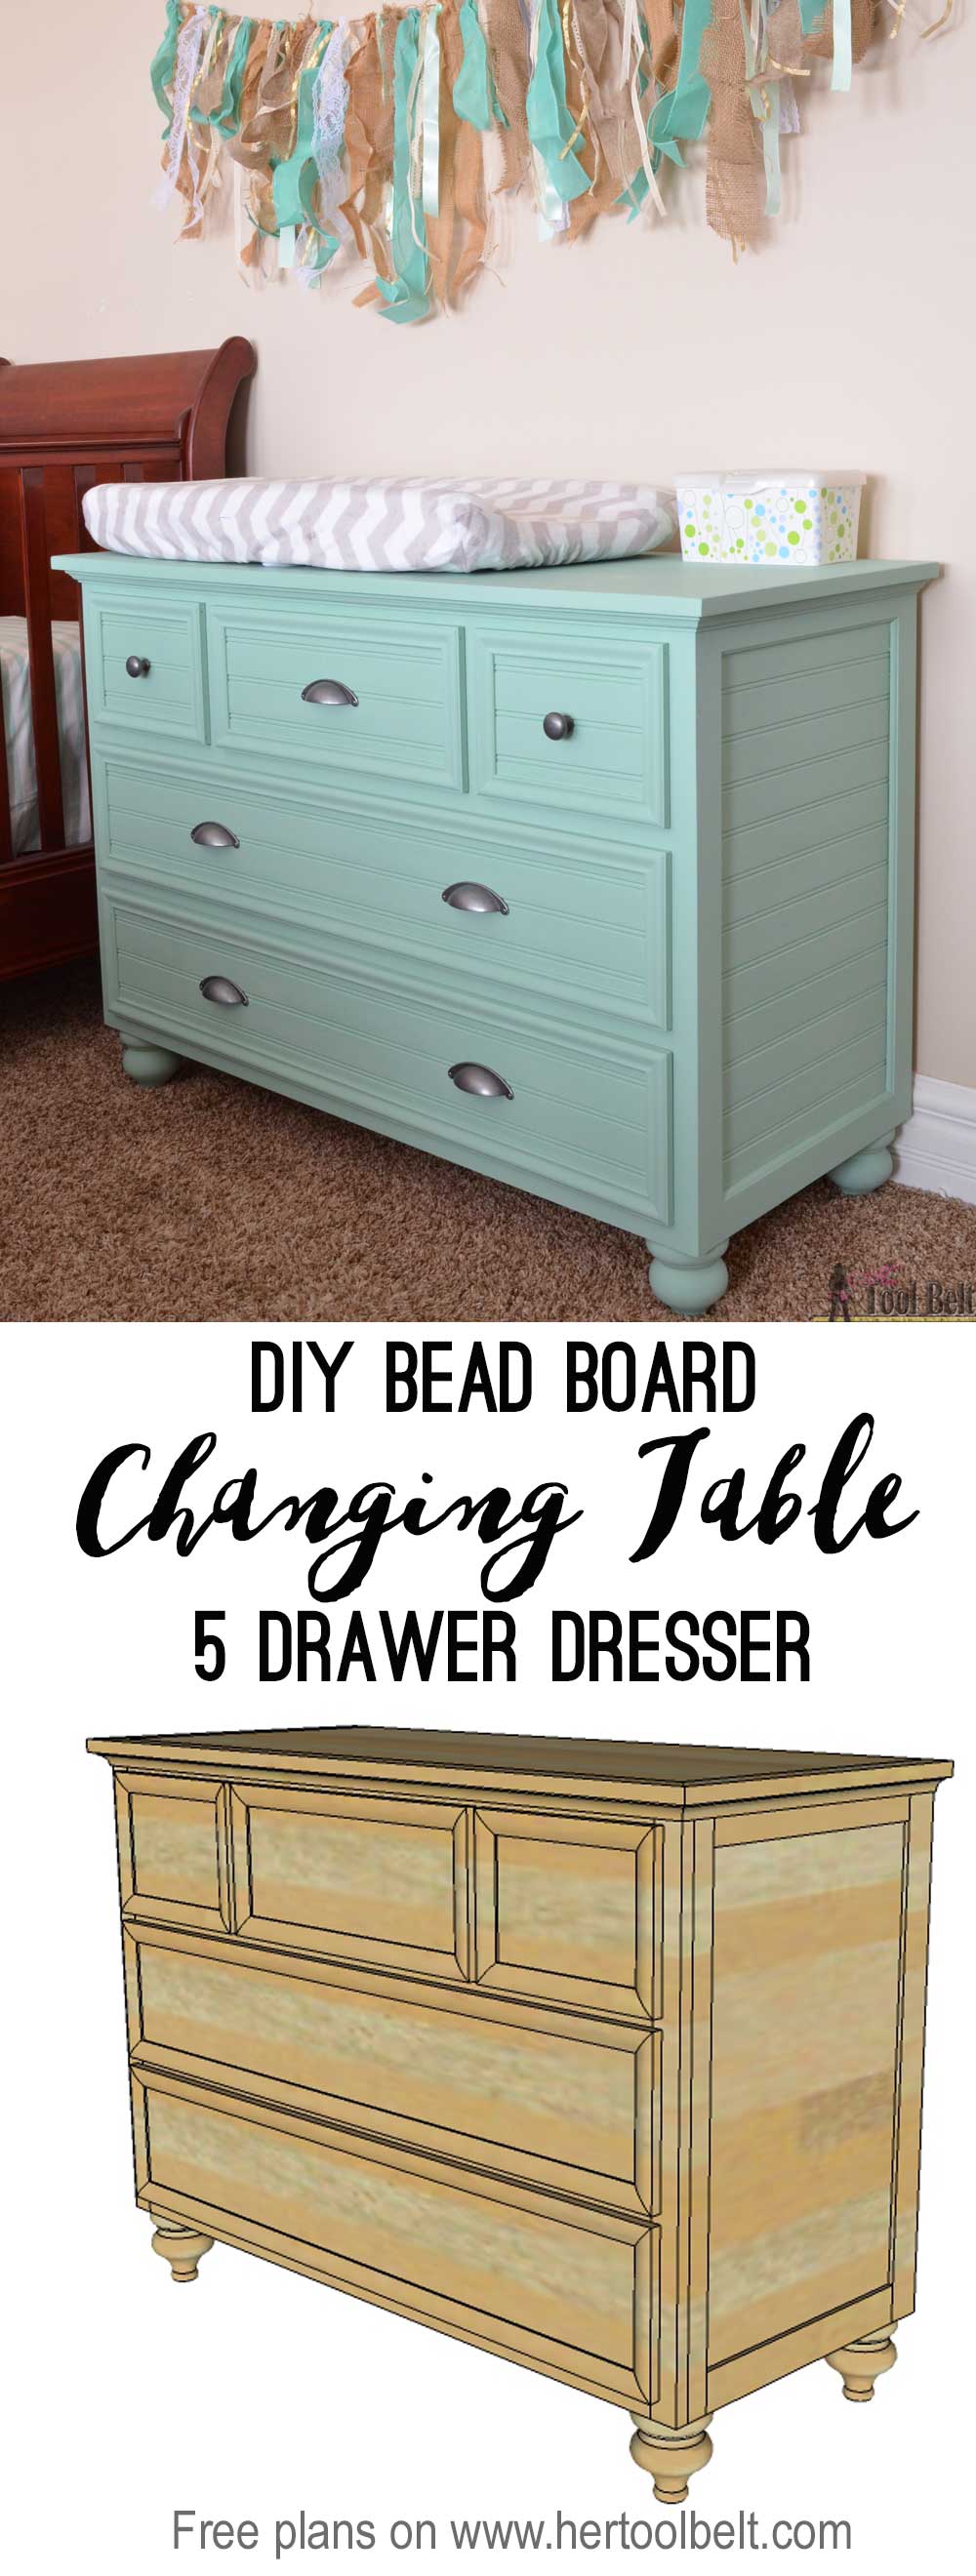
How to Build a 5 Drawer Dresser – Changing Table
Materials
- 1 1/2 sheets of 3/4″ plywood (4′ x 8′)
- 1/2 or 1 sheet bead board
- 7 – 1″ x 2″ x 8′ boards (actual dimensions 3/4″ x 1 1/2″)
- 2 – 1″ x 3″ x 8′ boards (actual dimensions 3/4″ x 2 1/2″)
- 28 feet of panel cap molding
- 8 feet cove molding if desired
- 4 ‘feet’ I used these from Lowe’s
- 4 leg top plate I used these from Lowe’s
- 1 1/4″ wood screws
- wood glue
- sandpaper
- wood filler
Cut List
Boards
- 2 – 3/4″ x 1 1/2″ x 41 1/4″
- 2 – 3/4″ x 1 1/2″ x 27″
- 2 – 3/4″ x 1 1/4″ x 27″
- 4 – 3/4″ x 1 1/2″ x 39 3/4″
- 10 – 3/4″ x 1 1/2″ x 17 1/4″
- 2 – 3/4″ x 1 1/2″ x 7″
- 2 – 3/4″ x 1 1/2″ x 19 1/4″ with 45 deg miter on one end
- 1 – 3/4″ x 1 1/2″ x 44 3/4″ with 45 deg miters on both ends
- 2 – 3/4″ x 2″ x 27″
- 4 – 3/4″ x 2″ x 15″
- moulding cut to fit
Plywood
- 1 – 3/4″ x 17 3/4″ x 41 3/4″
- 1 – 3/4″ x 17 1/4″ x 41 1/4″
- 2 – 3/4″ x 16 1/4″ x 37 1/4″
- 4 – 3/4″ x 6″ x 37 1/4″
- 1 – 3/4″ x 16 1/4″ x 14 3/4″
- 2 – 3/4″ x 6″ x 14 3/4″
- 10 – 3/4″ x 6″ x 17 3/4″
- 2 – 3/4″ x 7 1/4″ x 16 1/4″
- 4 – 3/4″ x 7 1/4″ x 6″
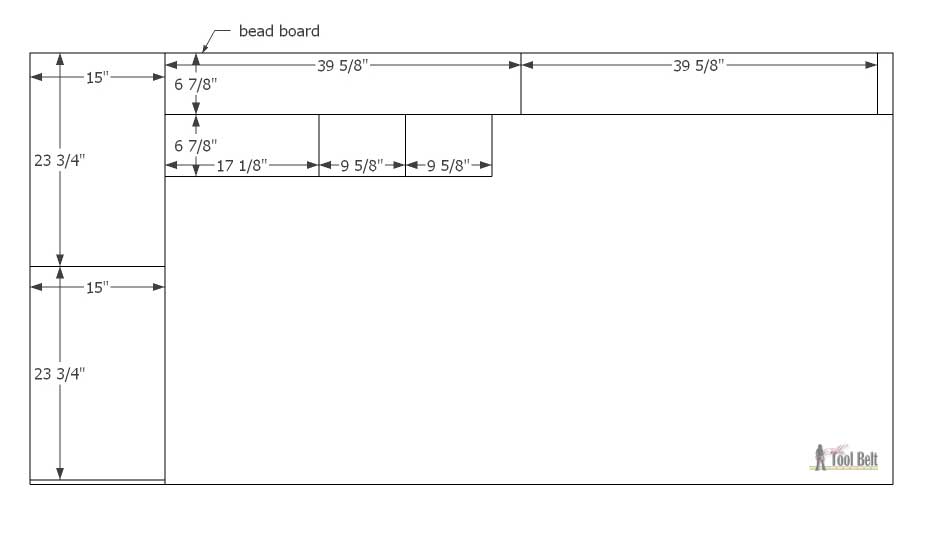
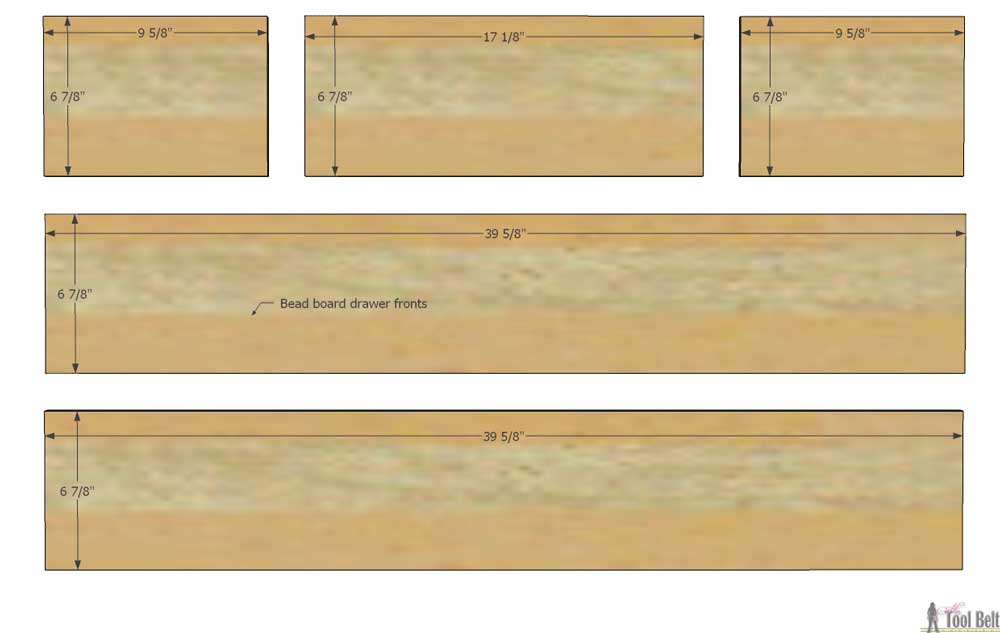
Bead board
- 2 – 1/4″ x 15″ x 23 3/4″
- 2 – 1/4″ x 6 7/8″ x 39 5/8″
- 1 – 1/4″ x 6 7/8″ x 17 1/8″
- 2 – 1/4″ x 6 7/8″ x 9 5/8″
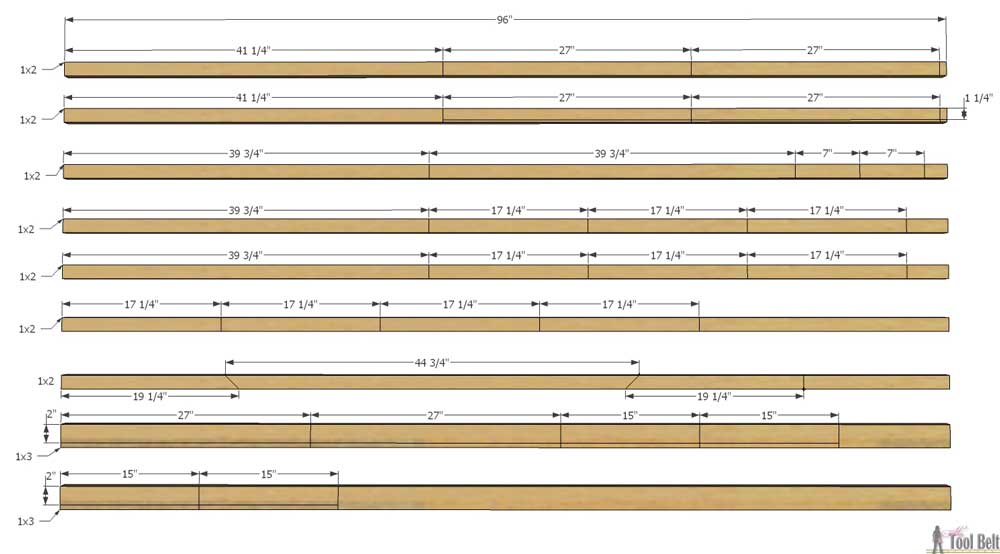
Cut Diagrams
Boards
3/4″ plywood
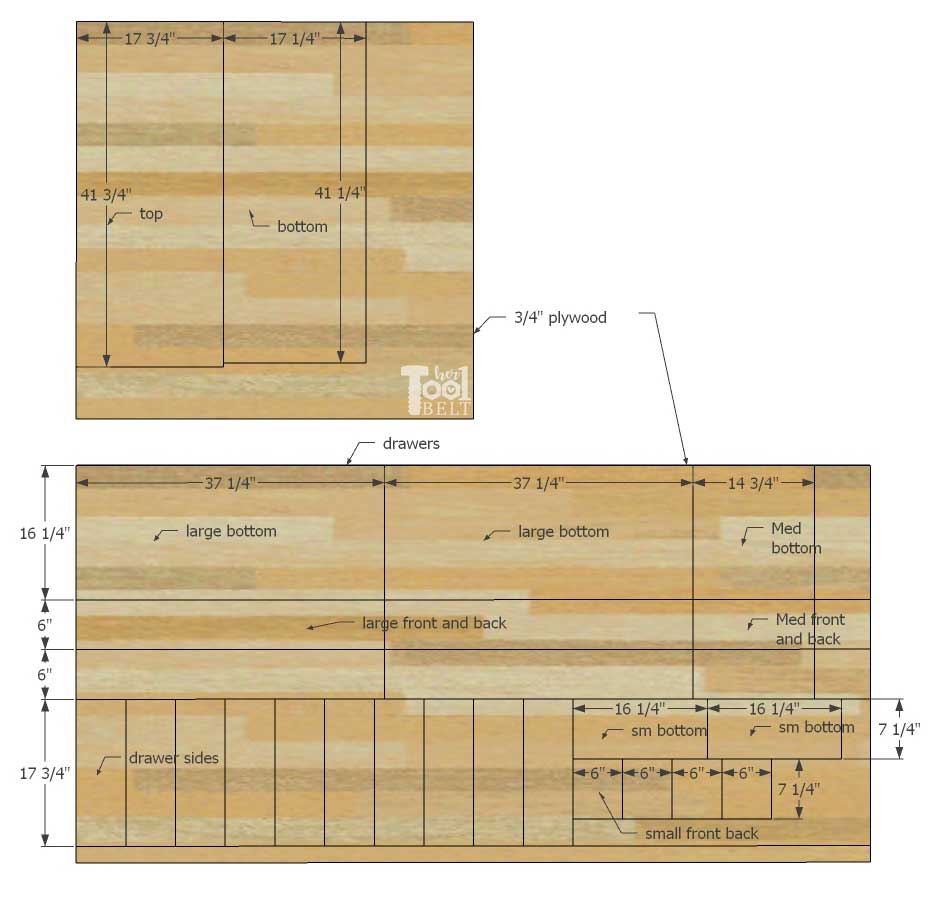
Bead board
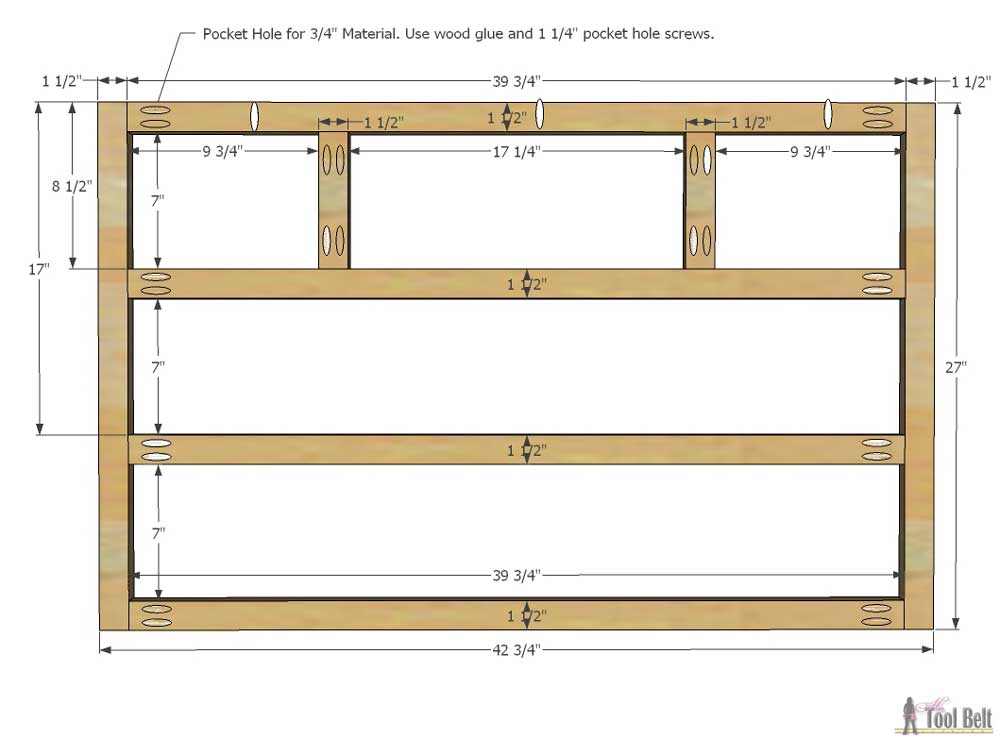
Step 1
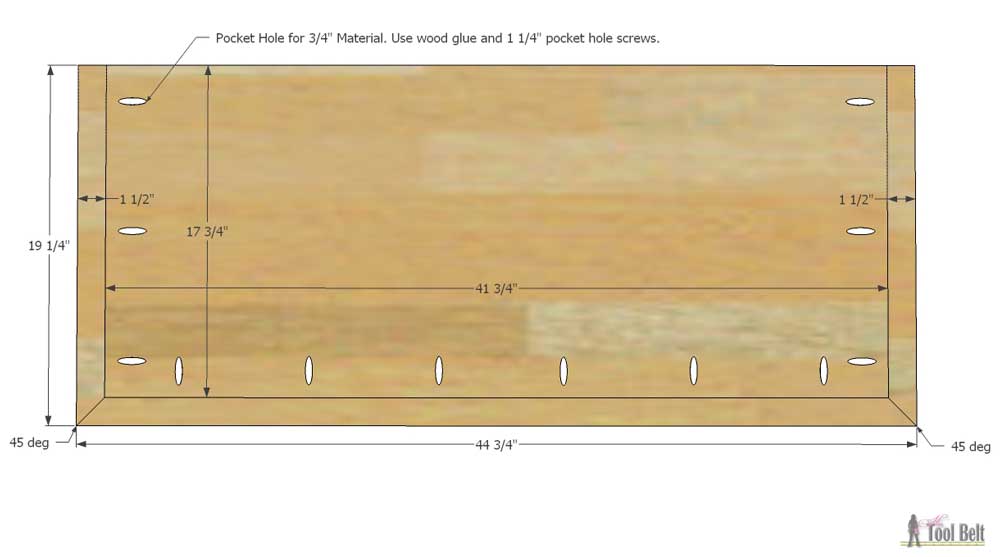
Use a Kreg pocket hole jig or R3 and drill pocket holes for 3/4″ material in both ends of 39 3/4″ and 7″ face frame boards. Also drill 3 pocket holes in the top 39 3/4″ board to attach the top later. On 2 of the 39 3/4″ boards measure and mark over 9 3/4″ from each end. Use wood glue and 1 1/4″ pocket hole screws to secure the 7″ boards between the 39 3/4″ boards as shown.
On the 1 1/2″ x 27″ boards mark 8 1/2″ and 17″ from the top. Attach a 39 3/4″ board flush with the top, at 8 1/2″, at 17″ and flush with the bottom. Use wood glue and 1 1/4″ pocket hole screws to secure.
Step 2
The side panels are made similar to cabinet doors. I used my raised panel router bits to make the side panels, but you can do the same thing with a table saw or a straight router bit, minus a few curves.
Each side panel has 5 pieces:
- 2 – 3/4″ x 2″ x 15″ (top and bottom rails)
- 1 – 3/4″ x 1 1/4″ x 27″ (front edge of panel)
- 1 – 3/4″ x 2″ x 27″ (back edge of panel)
- 1 – 1/4″ x 15″ x 23 3/4″ (beadboard or plywood)
The front and back stiles (27″ vertical pieces) only need a 1/4″ wide groove cut 3/8″ deep down the center. You can do multiple passes on the table saw with the blade 3/8″ high or with a 1/4″ straight router bit on a router table.
The top and bottom rails (15″ horizontal pieces) also need a 1/4″ wide groove cut 3/8″ deep down the center. On each end of the stiles cut a groove on each corner that is 1/4″ wide and 3/8″ deep. This will leave a 3/8″ long tab on each end that will fit into the groove on the 27″ stiles.

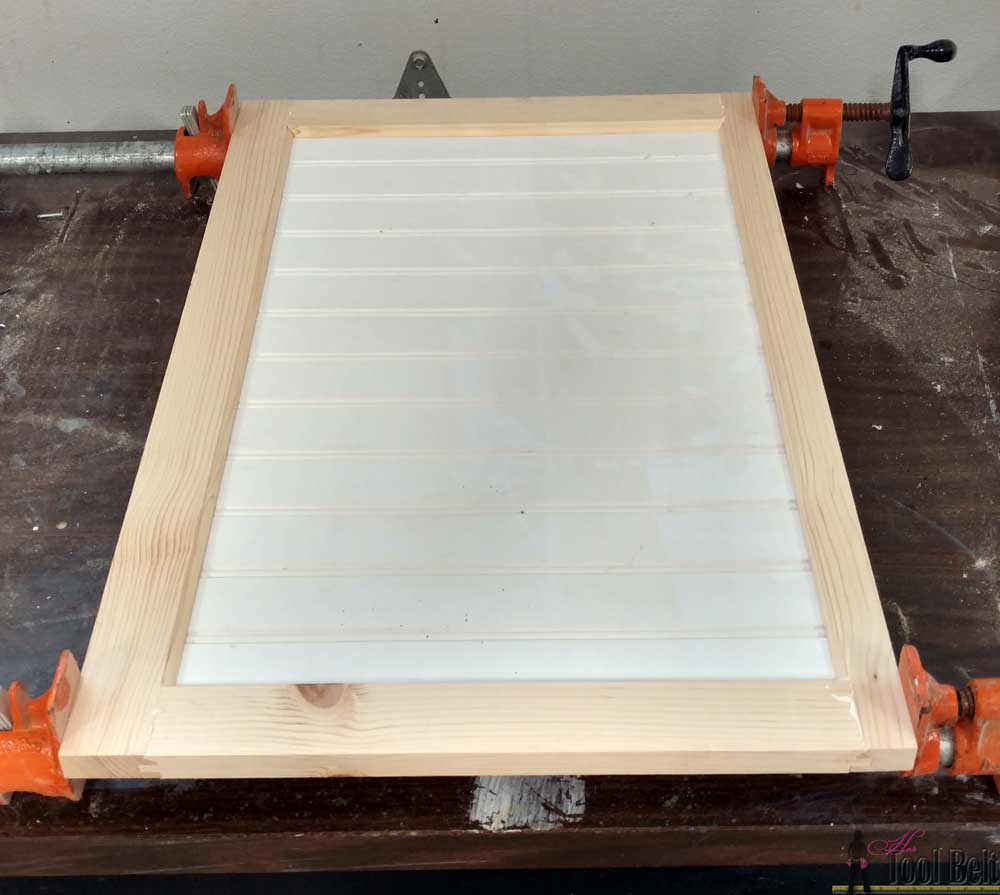
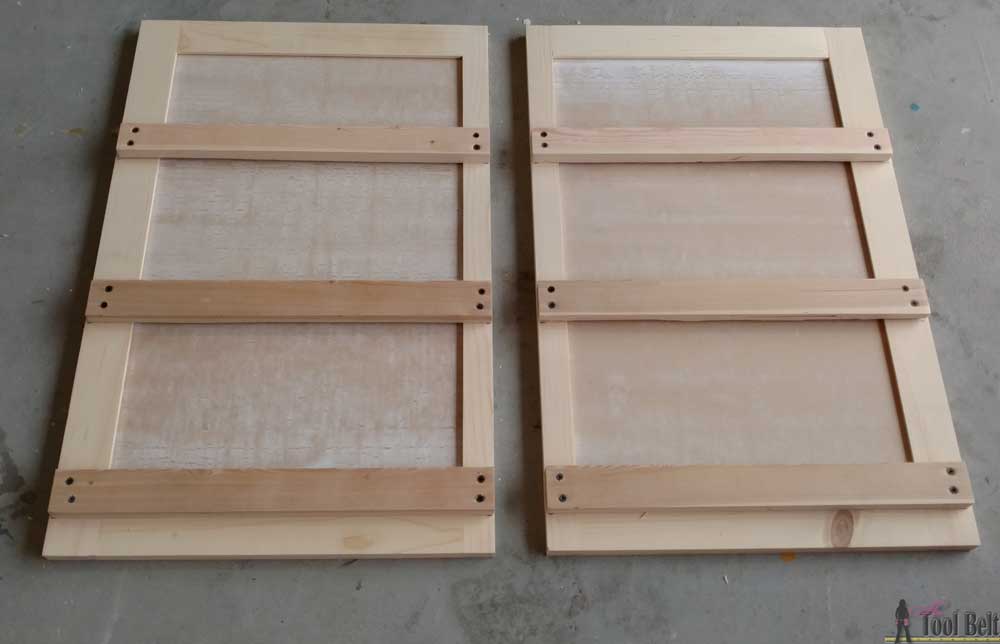
The two side panels need to be mirror images of each other.

Dryfit the rails into the stiles to make sure the tab will snuggly fit into the groove. Place the bead board into the grooves and glue the tabs into stile grooves and clamp until the glue is set. Make sure you make the sides mirror each other, 1 1/4″ piece is the front and bead board facing out.
Once the glue has set, drill pocket holes for 3/4″ material along the front inside and a couple in the top.
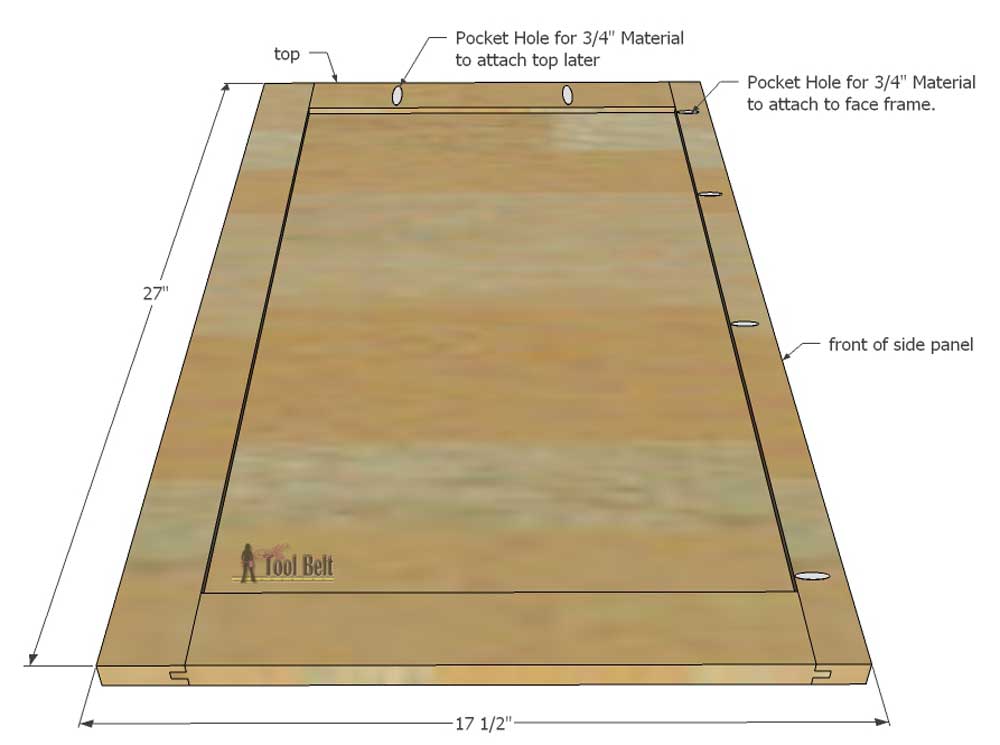
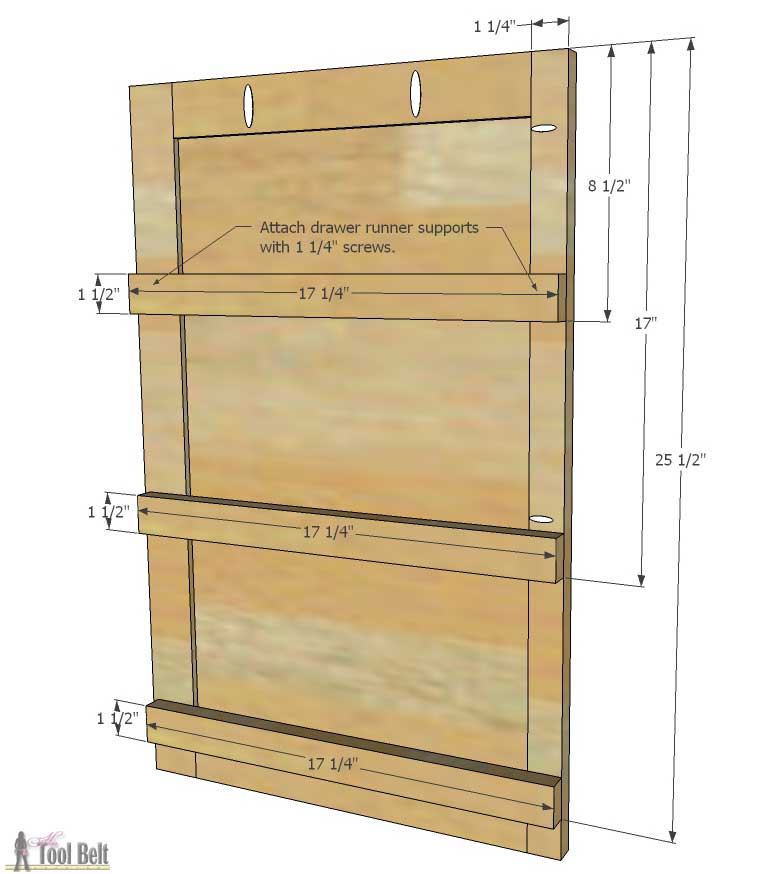
Measure and mark on both the front and back stiles 8 1/2″, 17″ and 25 1/2″. Drill a couple of countersink holes in each end of 6 of the 17 1/4″ boards. Attach a 17 1/4″ board at each mark with 1 1/4″ wood screws make the screw heads flush or lower, these will be where you mount your drawer runners later.
Step 3
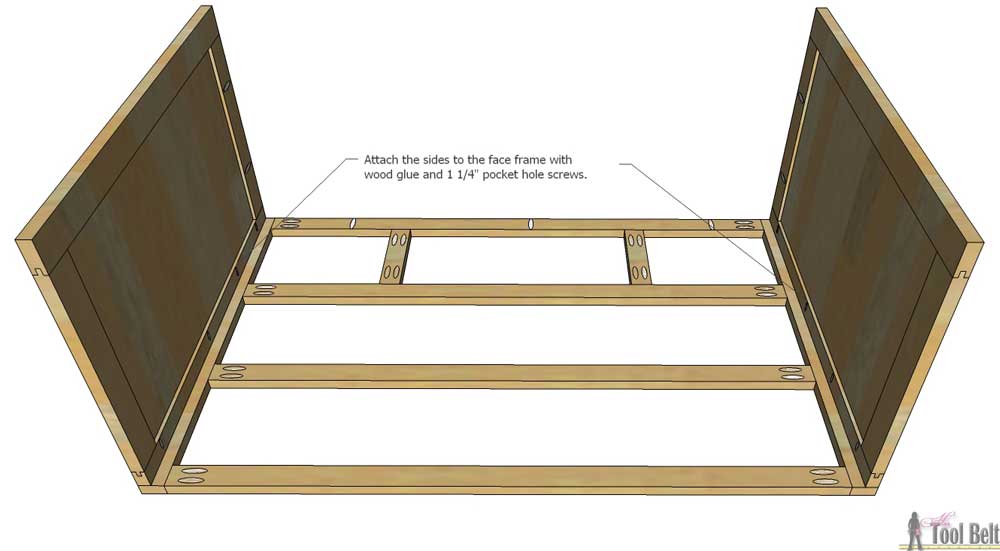
Attach the sides to the face frame with wood glue and 1 1/4″ pocket hole screws.
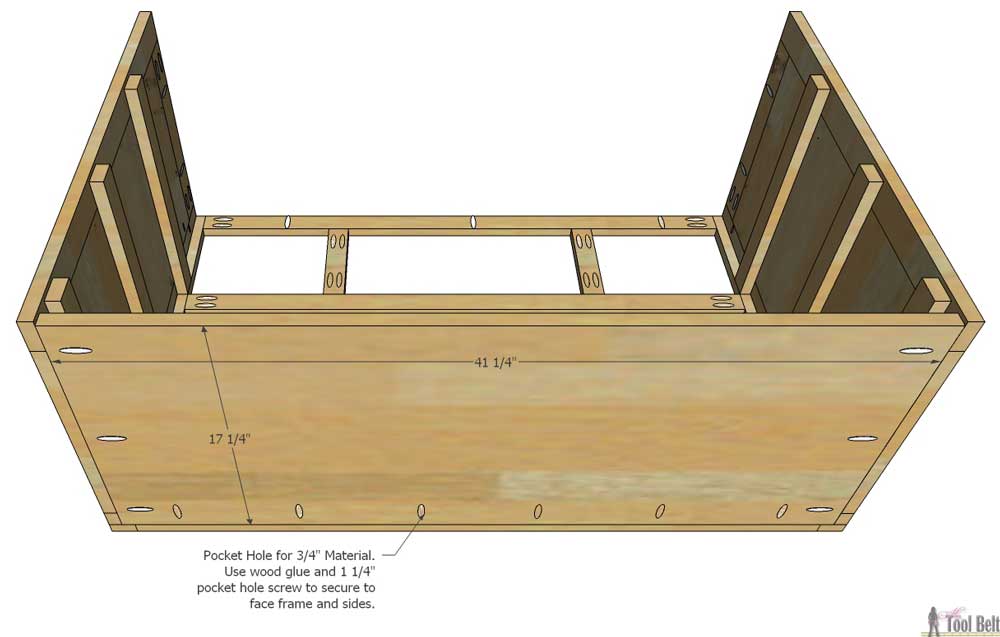
Drill pocket holes for 3/4″ material in 3 sides of the bottom plywood (17 1/4″ x 41 1/4″). Attach plywood bottom to be flush with the bottoms of the face frame and sides, secure with wood glue and 1 1/4″ pocket hole screws.
Drill pocket holes for 3/4″ material in both ends of the 41 1/4″ boards. Attach one flush with the top, inset 1/4″ and secure with 1 1/4″ pocket hole screws. Inset the second 41 1/4″ board 1/4″ and attach just under the top drawer runner support. From both sides of the lower 41 1/4″ board mark 9 3/4″ from the drawer runner support board as shown. Drill pocket holes in one end of each of the 4 – 17 1/4″ drawer runner supports. Attach 2 sandwiched 17 1/4″ drawer runner supports to the bottom of the 7″ face frame boards and at the mark on the 41 1/4″ board. (You can either use pocket holes or attach from the 41 1/4″ board into the 17 1/4″ boards.)
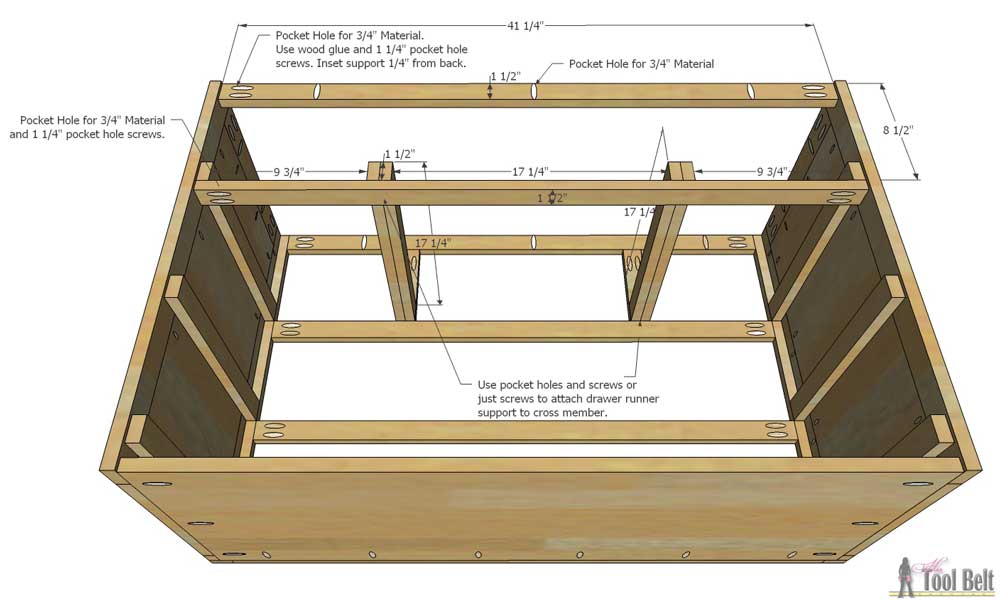
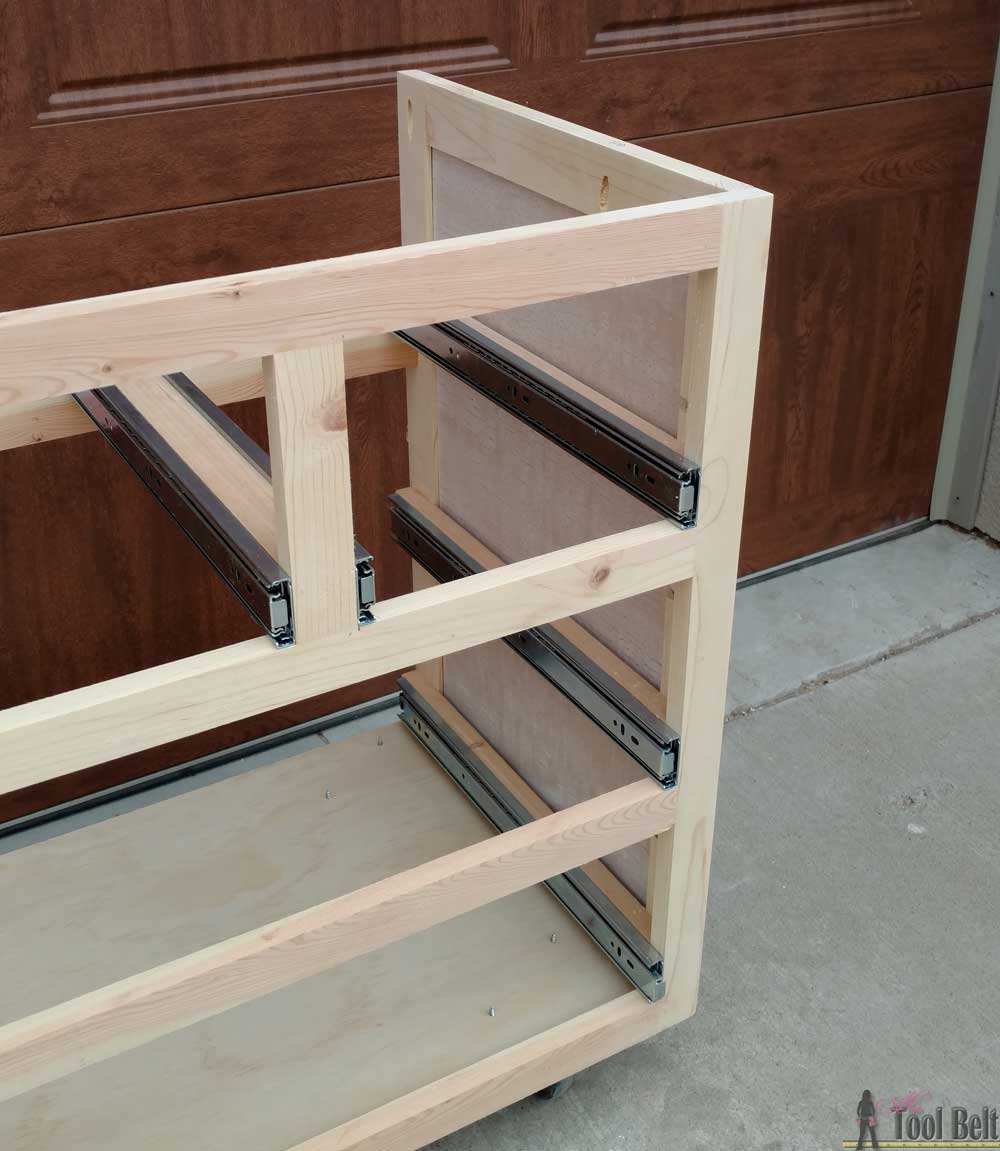
Attach the drawer runners onto the drawer runner support boards. The front of the drawer runners will be flush with the front of the face frame.
Step 4
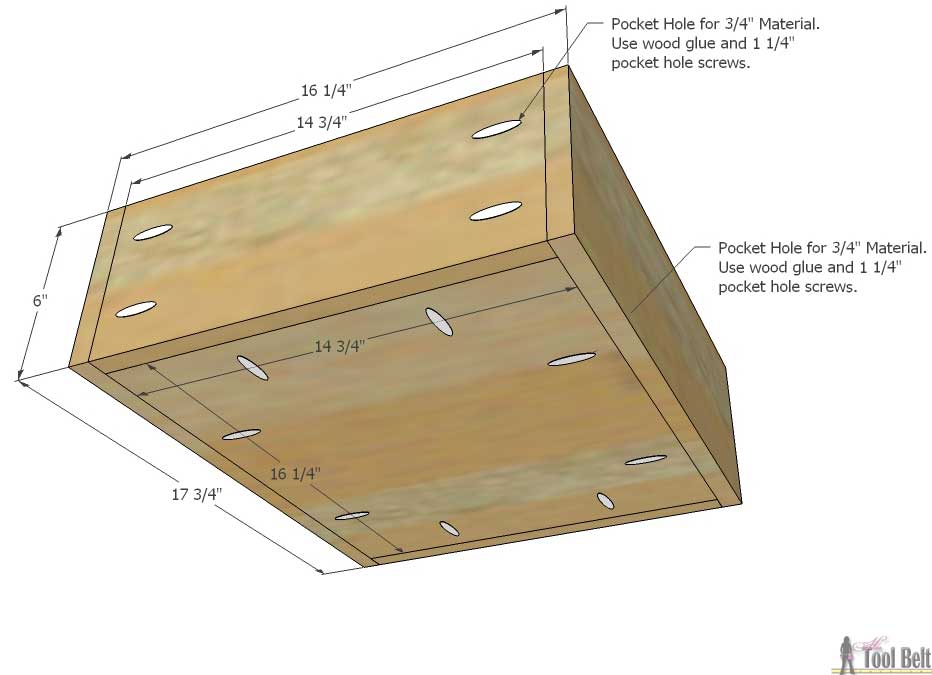
Drill pocket holes for 3/4″ material around the edges of the drawer bottoms and also a couple on each end of the drawer front and backs. Use wood glue and 1 1/4″ pocket hole screws to attach the 37 1/4″ x 6″ drawer front and back to the 37 1/4″ sides of the drawer bottom.
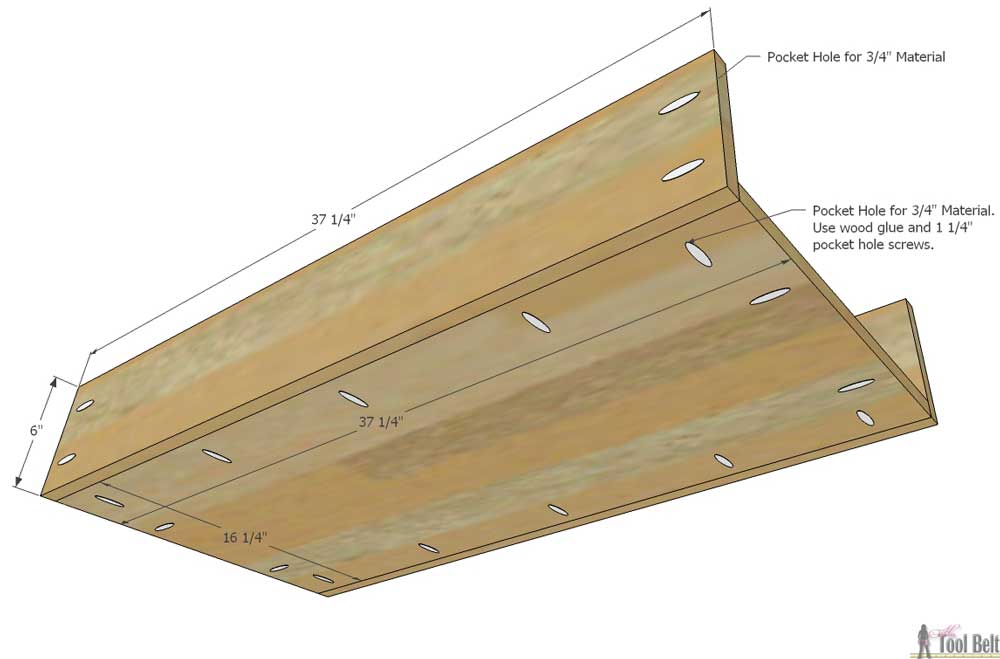
Attach drawer sides to the drawer bottom and front and back pieces with wood glue and 1 1/4″ pocket hole screws.

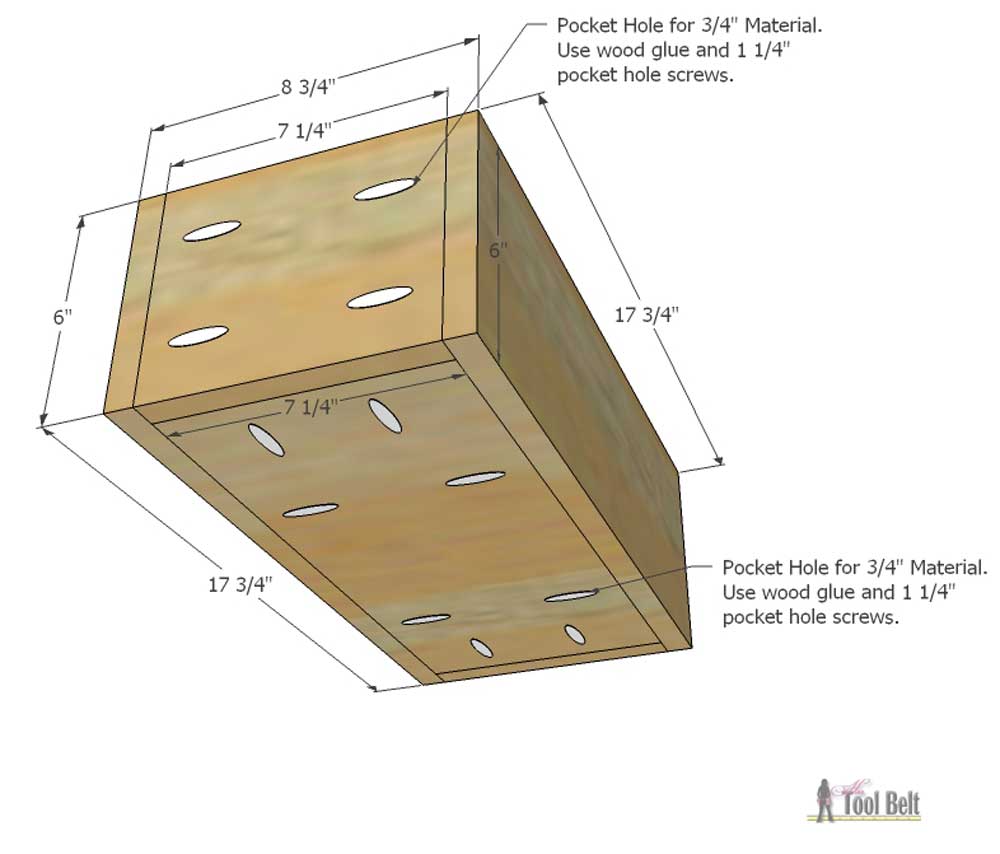
Drill pocket holes for 3/4″ material around the edges of the drawer bottoms and also a couple on each end of the drawer front and backs. Use wood glue and 1 1/4″ pocket hole screws to attach the 14 3/4″ x 6″ drawer front and back to the 14 3/4″ sides of the drawer bottom.
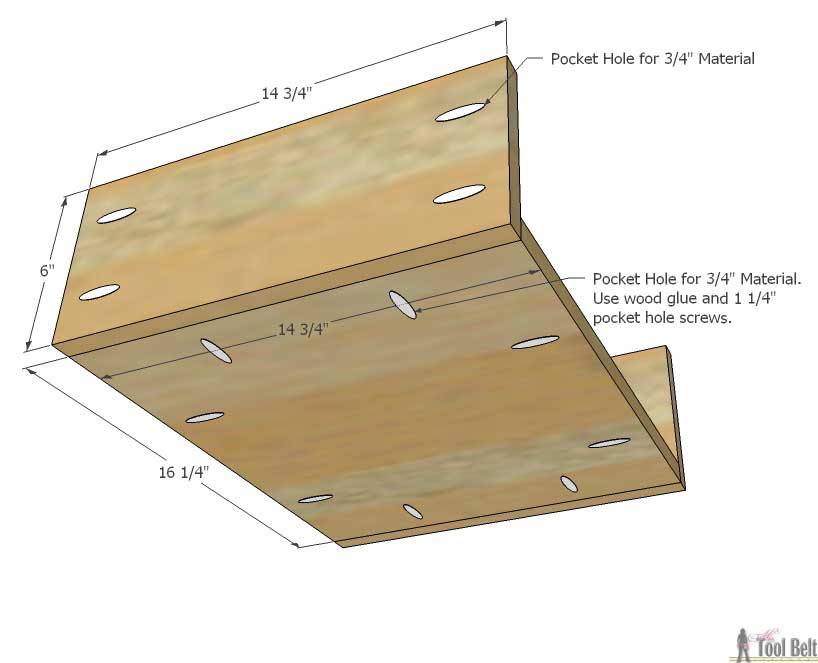
Attach drawer sides to the drawer bottom and front and back pieces with wood glue and 1 1/4″ pocket hole screws.
Drill pocket holes for 3/4″ material around the edges of the drawer bottoms and also a couple on each end of the drawer front and backs. Use wood glue and 1 1/4″ pocket hole screws to attach the 7 1/4″ x 6″ drawer front and back to the 7 1/4″ sides of the drawer bottom.
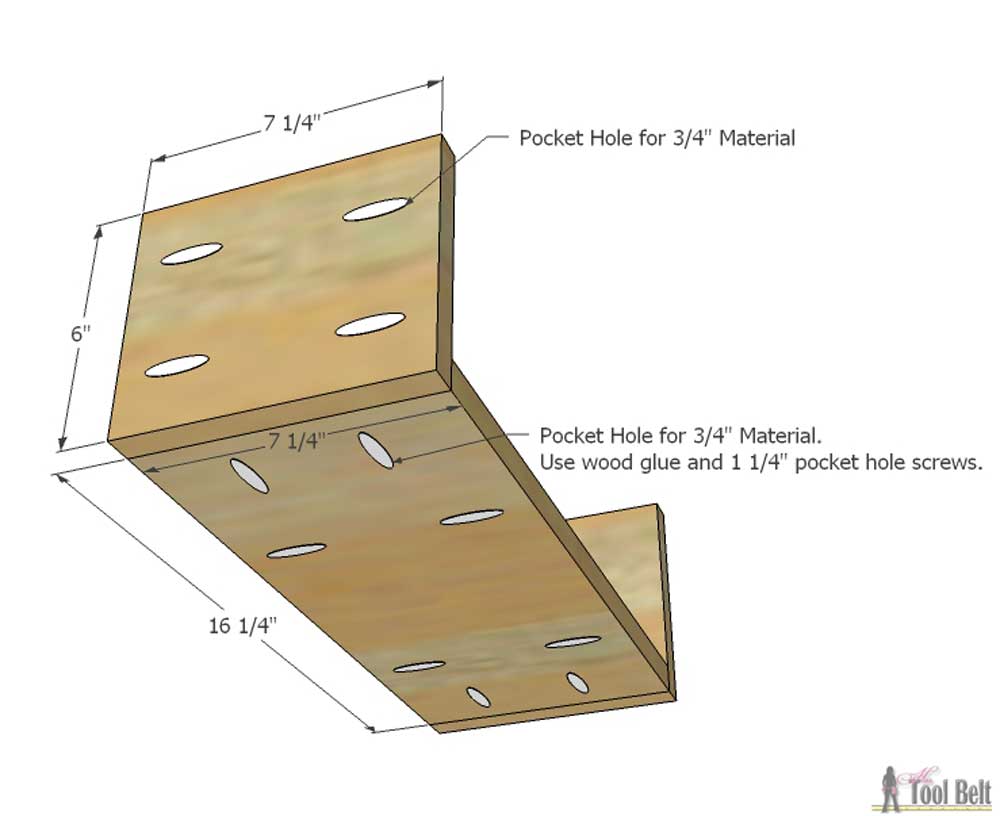
Attach drawer sides to the drawer bottom and front and back pieces with wood glue and 1 1/4″ pocket hole screws.
Attach the inner piece of the drawer runners to the drawer. I remove the inner piece, put the front of the runner flush with the drawer front and flush with the bottom of the drawer and screw the runners in place. This method always works out good for me.
Step 5
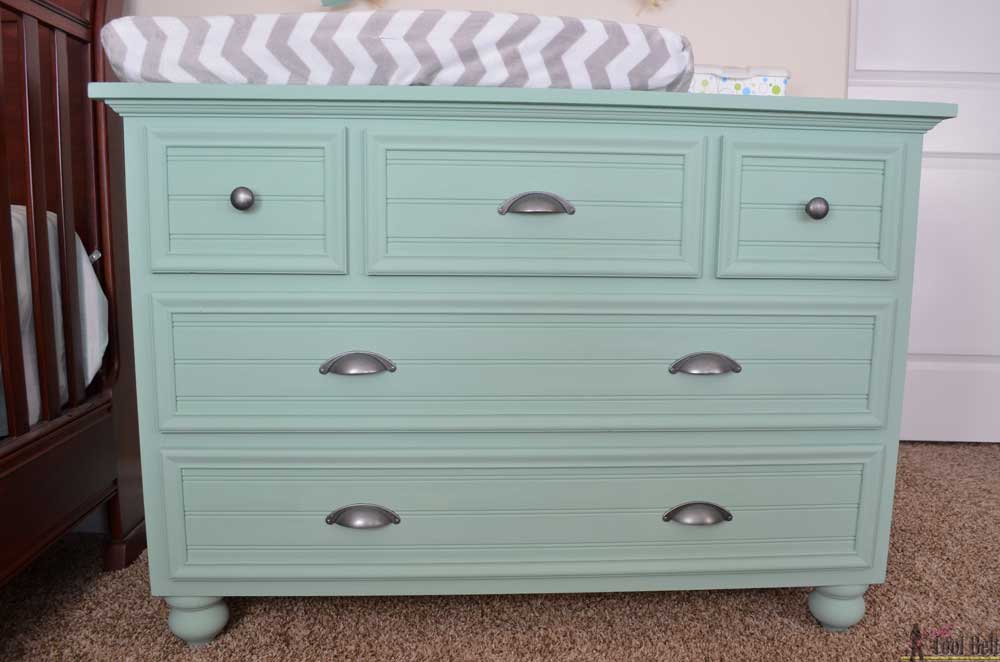
Cut all of the bead board pieces for the drawer fronts. It will look better if you keep the bead board lines the same spacing the same for each drawer front.
Cut the panel cap molding to fit around the bead board. These are the dimensions for mine to give you a ball park.
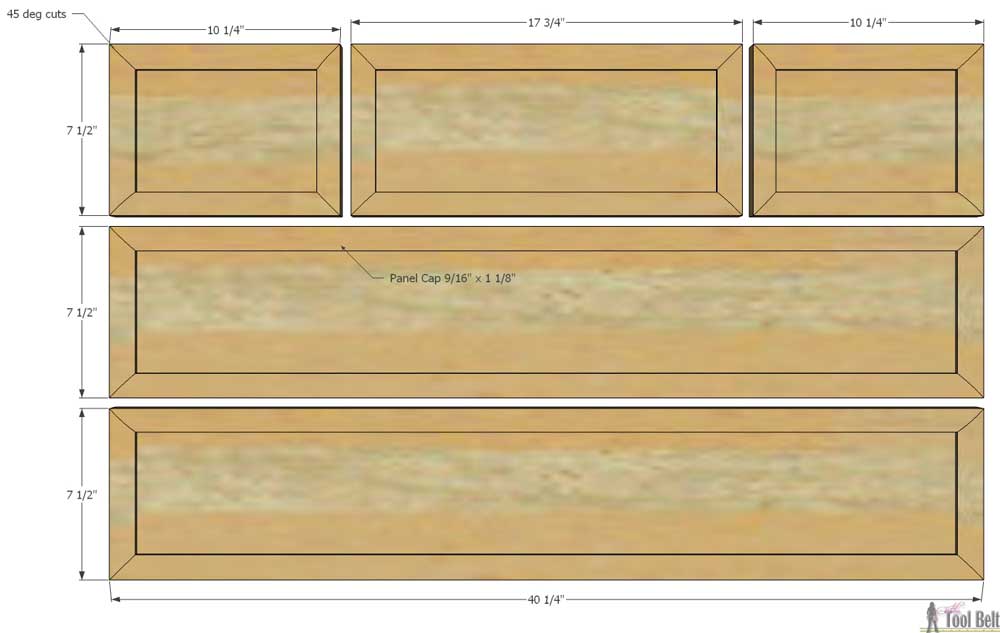
You want the corners to line up the the bead board like this:

There really isn’t anything to nail the panel cap molding to, so I glued the molding to the bead board and nailed the bead board to the drawer front.

Step 6
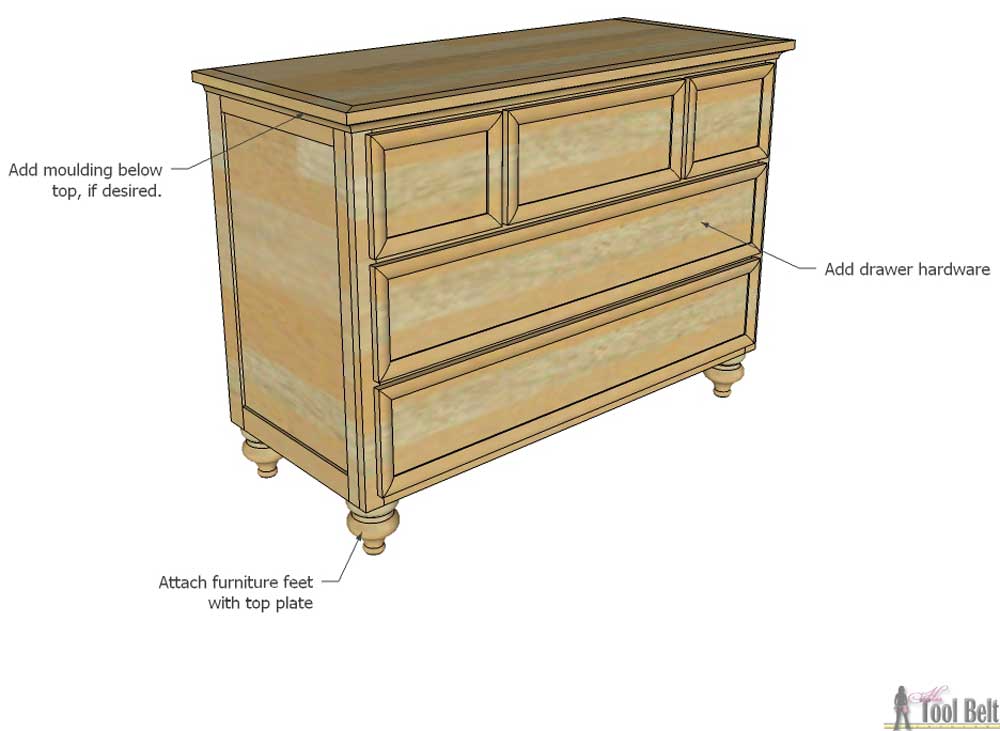
Drill pocket holes for 3/4″ material around 3 sides of the top plywood (17 3/4″ x 41 3/4″). Attach the 19 1/4″ and 44 3/4″ trim pieces to the top plywood with wood glue and 1 1/4″ pocket hole screws. Attach the top to the dresser with 1 1/4″ pocket hole screws. The back should be flush with the dresser back and the sides centered.
If you want, add molding under the top. Cut it to fit and secure with brad nails. Attach the bun feet to the bottom of the dresser with a top plate and twist the feet on. Drill holes for drawer knobs and pulls.
Step 7
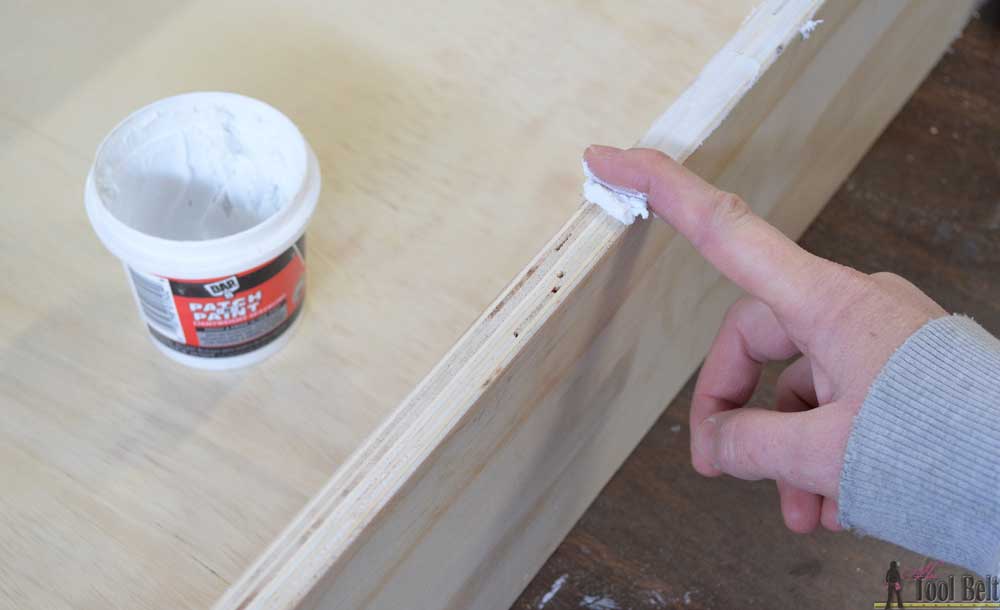
Fill in any cracks or blemishes with wood filler and allow to dry. If I’m going to paint plywood edges I like to skim coat the edges with wood filler or spackle to make it smooth.
Sand the dresser smooth. Start with 80 grit sandpaper and finish with 120-180 grit sandpaper in the direction of the wood grain.
I painted the dresser with a pretty chalk based paint Amy Howard at Home One Step Paint – Barefoot in the Park. The one step paint means that you don’t have to prime, but you may need a second coat. I brushed the paint on with a chip brush and it went on the bare wood nice and smooth. The bead board definitely needed two thin coats. 1 quart of paint did two thin coats on the outside of the dresser and 1 thin coat on the drawers, without a drop to spare.
After the one step paint you may want to use waxes to give the paint a protective finish. I plan on trying a new world Toscana finish, so mine isn’t waxed in the pictures.
I love how the changing table turned out. It’s perfect for storing all of her stuff…and changing diapers which I do a lot of!
Click >>>> HERE<<<< to download free plans
Thanks for pinning the changing table!
I received Amy Howard at Home product to use on this project, all ideas and opinions are my own.
Linked to link parties remodelaholic and savvy southern style
Original article and pictures take https://www.hertoolbelt.com/5-drawer-dresser-changing-table/ site
Комментариев нет:
Отправить комментарий